
🛠️ How to change your minecraft server's version [Full Guide]
Change Your FreezeHost Minecraft Server Version: A Step-by-Step Guide
Do you want to play the newest Minecraft game? Or maybe you want to go back to an old version to play with your friends? Good news! At FreezeHost, you can change your server's version easily from our control panel using our new, streamlined version picker.
Changing your server version is a powerful thing to do. But it can be risky for your world files if you don't do it the right way. This guide will show you how to do it safely. This way, all your hours of building, exploring, and mining will stay safe!
Before You Start: The Most Important Rule – Make Backups!
This is the most important step. If you change your server to an older version (like from 1.20 to 1.19) or jump many versions, it can sometimes break your world files. This means you could lose your game progress.
At FreezeHost, you can control all your server files. This means you also need to make your own backups. Before you change anything, you must make a copy (backup) of your world.
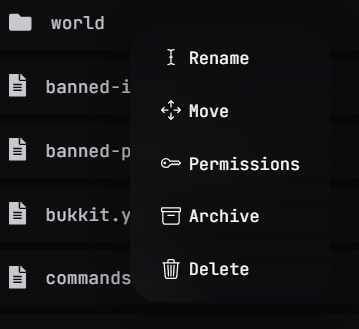
Here’s how to do it:
- Go to our panel and pick your server.
- Click on the "Files" tab.
- You will see your server's folders. Find the folder named
world. Right-click on it (press the right button on your mouse) and choose "Archive." This will make a compressed file (a.tar.gzfile) of your main world. - Do this again for your other world parts:
- Right-click
world_netherand choose "Archive". - Right-click
world_the_endand choose "Archive".
- Right-click
Once you see world.tar.gz, world_nether.tar.gz, and world_the_end.tar.gz in your file manager, it means your world is safe. Now you can go ahead and change the version.
How to Change Your Minecraft Server Version: Using the Version Picker
This is the easiest and most recommended way to change your server's Minecraft version, as it handles the installation process, EULA acceptance, and even offers an option to start with a fresh world.
- Log in to our panel and select your server.
- Navigate to the "Tools" tab.
- Click on the "Versions" option.
- You'll see a list of available Minecraft server software types (e.g., PaperMC, Spigot, Vanilla Minecraft, Forge, Fabric). Click on the software type you wish to use.
- A single pop-up window will appear. In this window, you can:
- Select your desired version from the list (e.g.,
1.20.1,1.19.4). - Choose whether to "Delete Old World Files." Select 'Yes' if you want a completely fresh start with a new world. Choose 'No' if you want to keep your existing world (recommended when simply updating to a newer minor version, but use caution if downgrading or jumping many major versions – ensure your backups are solid!).
- Ensure "Accept EULA" is checked to automatically accept the Minecraft End User License Agreement.
- Select your desired version from the list (e.g.,
- Click the "Install" button within this pop-up to confirm. The server will download and install the new version. This might take a few moments.
- Once installed, your server will typically restart automatically with the new version.
You Are Done!
That's it! You have successfully and safely changed your Minecraft server's version. Enjoy your game!